

This UK grow tent guide setup is your complete resource for indoor growing success. If there is one piece of equipment that genuinely transforms an indoor grow, it is the grow tent. Walk into any serious UK grower’s set-up and you will find the same thing: a reflective, light-proof, ventilated enclosure that turns a spare corner of a loft, shed, or bedroom into a precisely controlled growing environment. This guide consolidates everything you need to know — from understanding what makes a quality tent to choosing the right size, selecting the essential equipment and dialling in your ventilation — so you can make confident decisions and avoid the costly mistakes that catch out beginners.
A complete step-by-step guide to setting up a grow tent from scratch, including equipment selection, assembly, and ventilation.
- Choose the right grow tent size
Match tent size to your plant count and available space. A 1.2m x 1.2m tent suits 2–4 plants; a 1.2m x 2.4m tent suits 4–6 plants with horizontal training. Factor in ceiling height — you need room for the light, ducting, and canopy with clearance above.
- Plan your grow space and source equipment
Identify the 6 essentials before buying: LED grow light, carbon filter, extraction fan, circulation fan, temperature and humidity monitor, and a heater for winter grows. Plan how ducting will route out of the tent and where your water and electrical supply are.
- Assemble the tent frame and hang interior fittings
Erect the tent frame following manufacturer instructions. Hang the grow light bar from the top crossbar using the provided ratchet hangers, leaving it at maximum height initially. Thread ducting ports and cables through the appropriate sock openings.
- Install the ventilation system
Hang the carbon filter inside the tent at the top (filters work best when hot air passes through them). Connect an inline extraction fan to the filter output and route ducting out through the tent’s exhaust port. Aim for at least one full air exchange per minute.
- Set up environmental monitoring and controls
Position a thermometer and hygrometer at canopy height — not near the floor or light. Connect your fan controller or environmental controller. Set your light timer to the correct photoperiod: 18 hours light for vegetative growth, 12 hours for flowering.
- Test everything before adding plants
Run all equipment for 24 hours before introducing plants. Check that negative pressure is achieved (tent walls should pull inward slightly when the extraction fan runs), verify temperatures and humidity are within target range, and confirm the light is operating correctly.
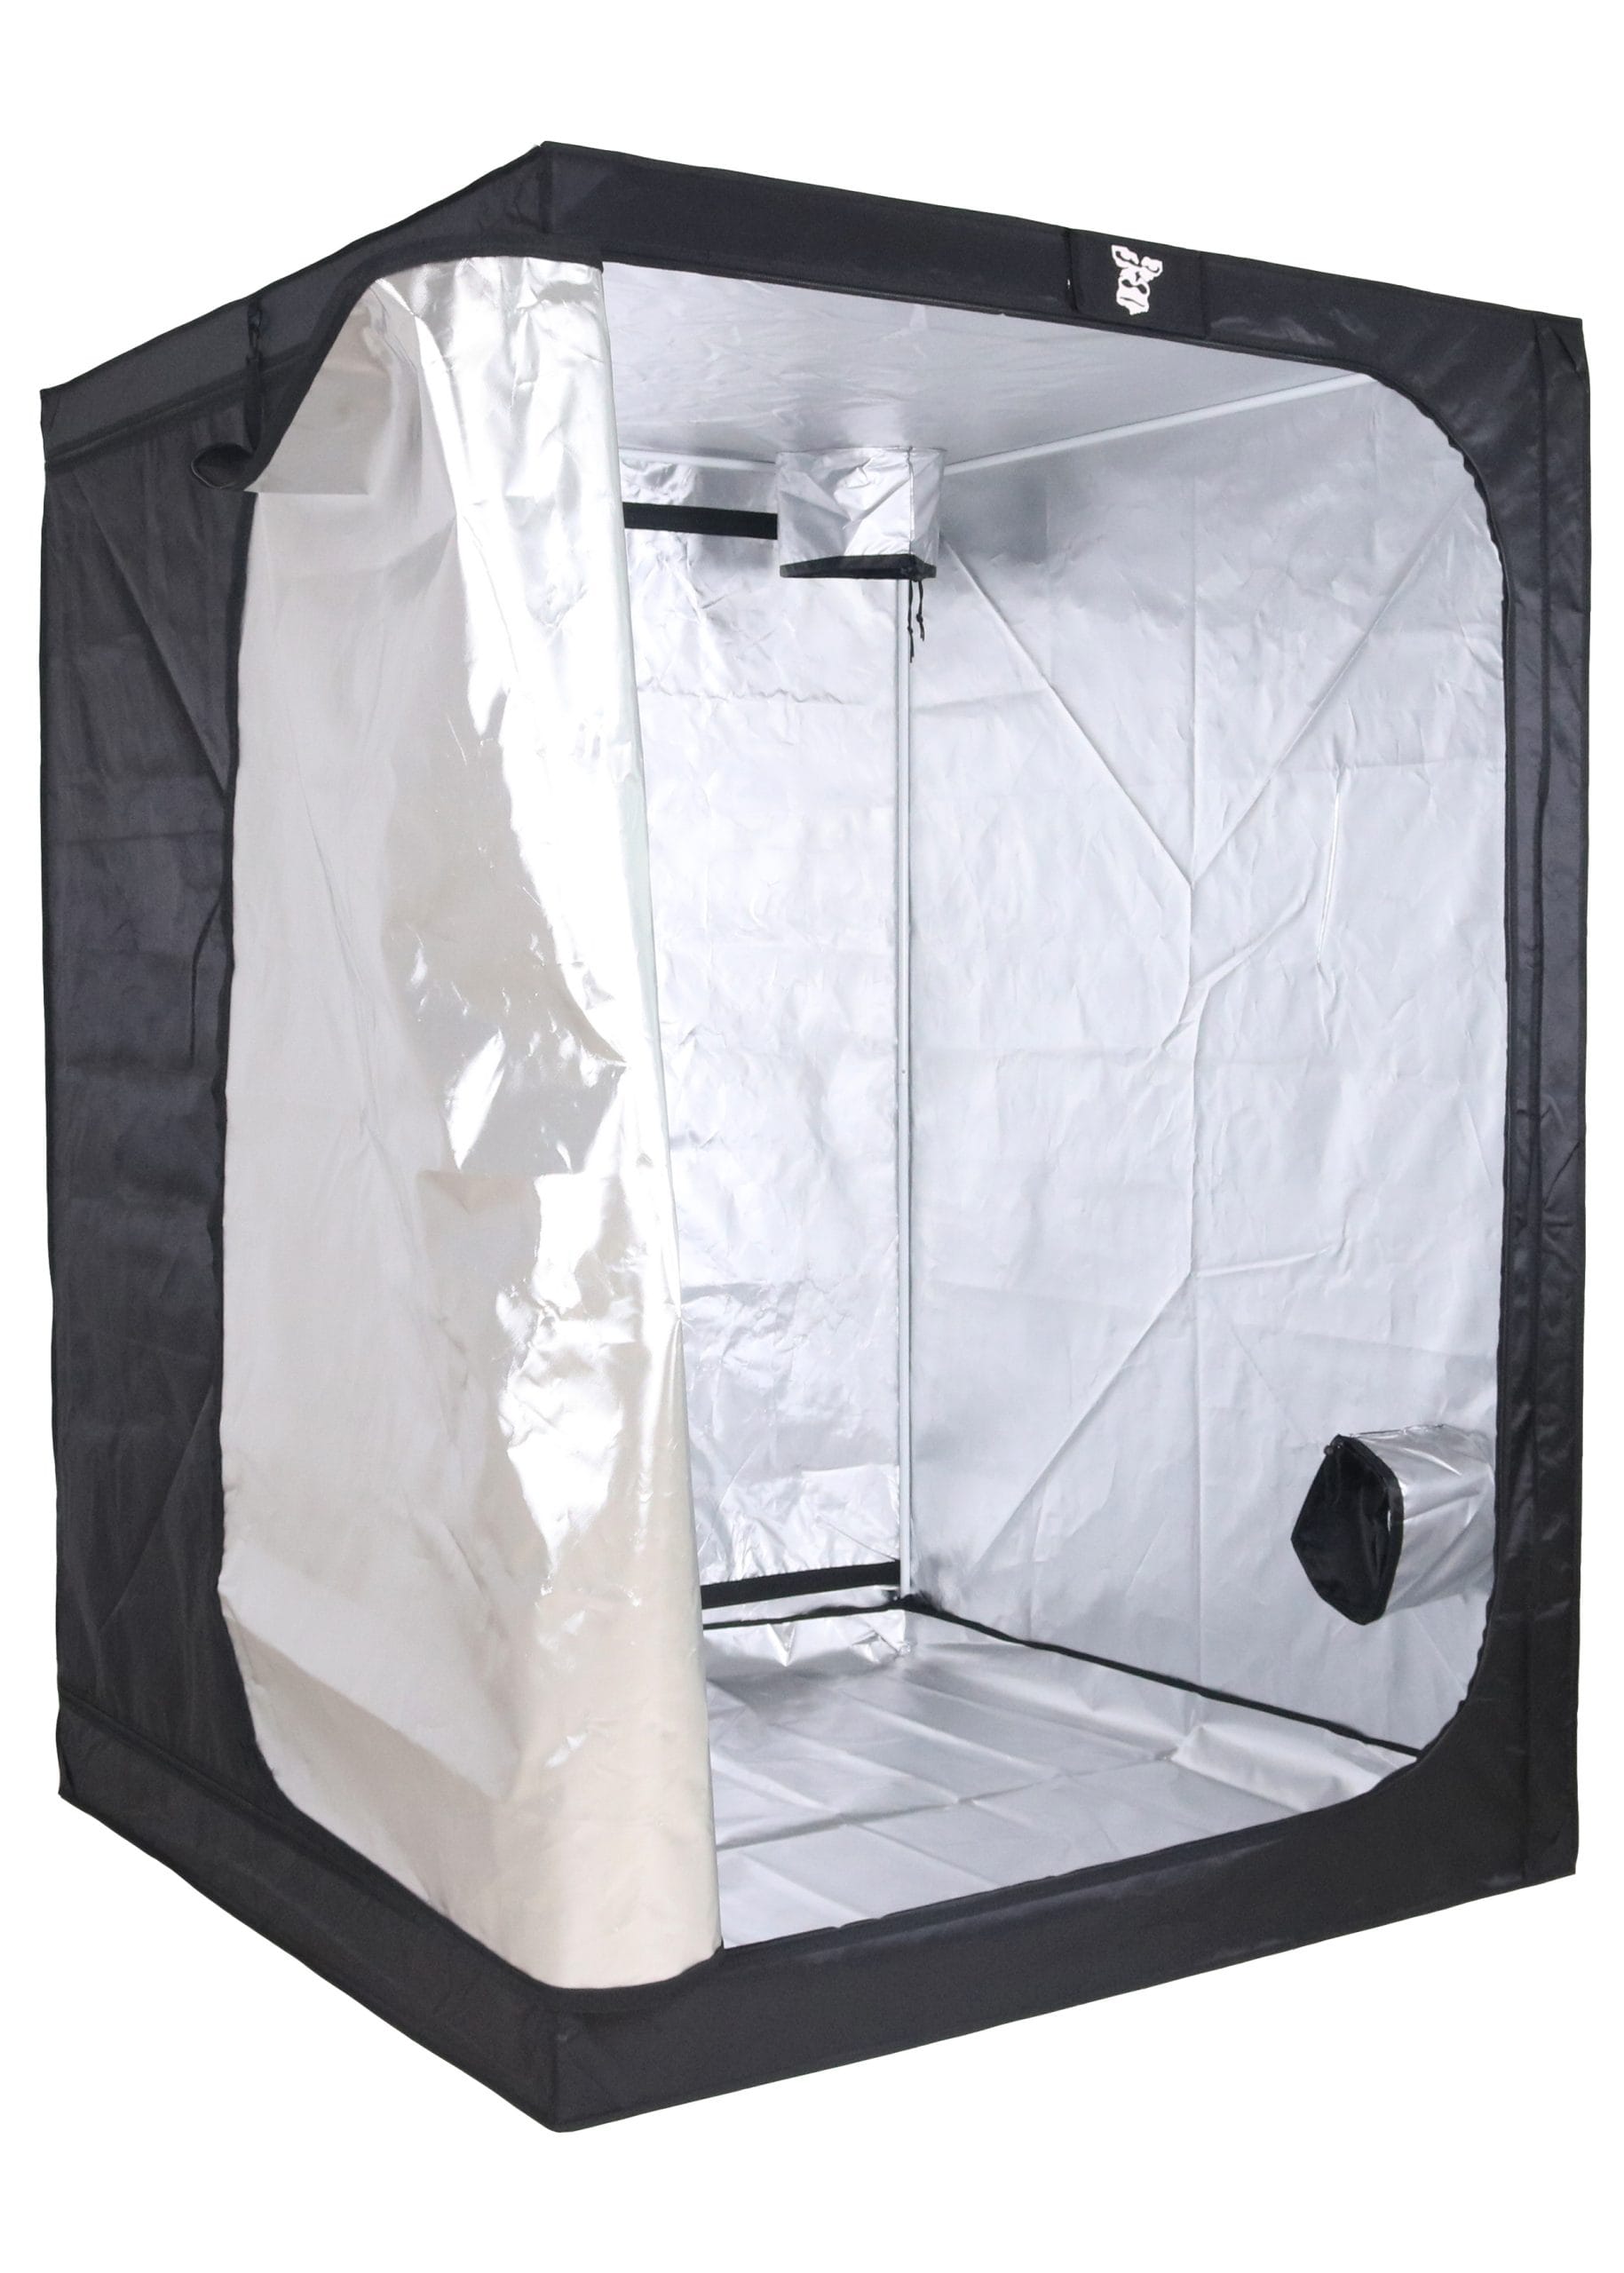
1. What Makes a Quality Grow Tent? The Anatomy Explained
A grow tent is far more than a fabric box. At its best, it is an engineered micro-environment. At its worst, it is a money-wasting light sieve. Knowing what to look for before you buy is the difference between a productive grow and a frustrating one.
Canvas Weight and Thickness
Canvas quality is measured in denier (D) — the higher the number, the denser and more durable the weave. Entry-level tents use 300D–600D fabric; this is adequate for a short-term or experimental setup. Serious growers invest in 1200D or 1680D tents. The heavier canvas is considerably more resistant to light leaks, punctures and zip failures, and will reliably last across multiple grow cycles. Secret Jardin’s DR range and the GorillaBOX Deluxe are built to this standard.
Reflective Mylar Lining
A white-painted wooden grow room reflects roughly 75–80% of light. A grow tent lined with high-grade Mylar reflects 92–97%. That difference is directly proportional to the photosynthetically active radiation (PAR) reaching your canopy, which means more productive growth from the same wattage of lighting. Cheap tents often use a thinner, crinkled Mylar that tears easily and develops dead spots over time. Look for thick, smooth, diamond-stitched Mylar that is bonded to the canvas rather than simply glued.
Zippers, Ports and Poles
The zipper is the most common point of failure on a grow tent — and the most common source of light leaks during the critical 12-hour dark period. Quality tents use heavy-duty YKK-style zippers with double-stitched runs and light-proof overlapping flaps. Ports (the circular openings for ducting, cables and fans) should be fitted with reinforced grommets that seal tightly when not in use. Structural poles should be steel or thick-gauge aluminium: the crossbars need to carry your extraction fan, carbon filter and grow light simultaneously — often a combined load of 20–40kg in a larger tent.
2. Choosing the Right Grow Tent Size
The single most common mistake UK growers make is buying a tent that is too small. They underestimate how much space lighting and ventilation equipment consumes, or how wide a canopy spreads at peak flower. The second most common mistake is buying too big and then struggling to maintain environmental parameters in a space they cannot fill with enough canopy.
The Rule of Thumb: 10 Litres per Foot of Height
A reliable starting point for soil growers is to provide 10 litres of growing medium for every foot of intended plant height. A plant you expect to reach 4ft at harvest needs a 40-litre container. Bear in mind that branches typically extend 13–15cm beyond the edge of the pot, so your effective canopy footprint is always larger than the container itself.
Sizing by Plant Count
| Tent Size (W×D×H) | Plants (mature) | Plants (small) | Ideal Light | Best For |
|---|---|---|---|---|
| 80×80×160cm | 2 | 8–10 | 200W LED | Beginners, small bedrooms |
| 120×60×150cm | 3 | 8 | 200–300W LED | Slim spaces, wardrobes |
| 120×120×200cm | 4 | 16 | 400–600W LED | Most home growers (best all-rounder) |
| 150×150×200cm | 6 | 20+ | 600W LED | Enthusiasts wanting larger yields |
| 240×120×200cm | 8 | 25+ | 2× 400W LED | Serious growers, dedicated grow room |
Height: The Often Overlooked Dimension
Tent height matters more than most beginners expect. You need to account for: the height of your grow light and its hanging clearance (typically 30–60cm), the distance between the light and the canopy (30–60cm depending on the fixture), and the plant itself. A 200cm tall tent that loses 60cm to a pendant light and 45cm of clearance leaves just 95cm of usable grow space — enough for a well-trained plant, but unforgiving of mistakes. If you are planning to grow tall varieties or train plants with a Screen of Green (ScrOG) setup, err on the side of a taller tent.
Single Tent vs. Multi-Tent Setups
For most home growers, a single tent managed in two stages — propagation under a small LED, then veg and flower under a full-power fixture — is sufficient. If you want to run a perpetual harvest, two tents allow you to stagger your crops: a small 60×60cm or 80×40cm propagation tent feeding a larger flower tent. The running costs (electricity, carbon filters) are higher, but so is the frequency of harvest.
3. Planning Your Grow Space Before You Buy
Time spent planning before you spend money is never wasted. The location of your grow tent determines everything else: how you manage heat, how you run ducting, how you access the tent for daily maintenance, and whether you can keep your grow private.
Choosing the Right Location
The loft is a popular choice among UK home growers: good height, discrete, away from living areas. The downsides are seasonal temperature swings — a loft can hit 40°C in summer and drop below 10°C in winter, both of which will stress plants and require additional climate control. A spare bedroom or a large cupboard maintains a more stable baseline temperature year-round. Garages and sheds sit somewhere between the two: usually well-ventilated, often uninsulated.
Whichever location you choose, the space needs to be: accessible for daily watering and inspection; able to prevent light from leaking out; capable of supporting adequate ventilation ducting to the outside; and reasonably airtight if you want to control odours.
Working Access and Watering
Draw a rough plan before you buy. Grow tents need to be accessed frequently — sometimes daily during late flower. Factor in how you will water (from above, or via run-off trays), where excess water drains, and whether you need access to a reservoir if you are running a hydroponic or coco system. Leaving 50cm of clearance around at least two sides of the tent is the minimum for comfortable working access.
4. The 6 Essential Pieces of Grow Tent Equipment
A grow tent is the shell; the equipment inside is what determines your results. The following six items are non-negotiable for a functioning grow.
LED Grow Lights
LED technology has replaced HID lighting as the standard for UK indoor growers. Modern full-spectrum LEDs deliver equivalent or superior yields at 40–60% less electricity than equivalent HPS fixtures. For a 120×120cm tent, a quality 400–600W LED provides adequate PPFD across the canopy. Avoid cheap “blurple” LEDs with narrow spectra — they are inefficient and under-powered. Look for a fixture with a Samsung LM301H or LM301B chip array and a minimum efficacy rating of 2.5 µmol/J.
Carbon Filter and Extraction Fan
Odour management is not optional. A correctly sized carbon filter paired with an extraction fan running at negative pressure keeps your grow discrete and removes excess heat and humidity simultaneously. To size your extraction system correctly, calculate your tent volume in cubic metres (W × D × H) and match it to a fan rated to turn over that volume at least once per minute. For a 1.2×1.2×2m tent (2.88m³), a fan rated at 300m³/h (accounting for filter restriction losses of roughly 20–25%) is appropriate. Mount the carbon filter at the top of the tent — hot, humid, odour-laden air rises — and duct it out through the extraction fan.
Clip Fan or Oscillating Fan
Canopy air circulation is distinct from extraction. A clip fan or oscillating fan positioned at canopy height keeps air moving around and beneath the leaves, which prevents hot and humid microclimates from forming, strengthens stems through mechanical stimulation, and dramatically reduces the risk of mould — particularly Botrytis during dense late-flower growth.
Temperature and Humidity Monitor
You cannot manage what you cannot measure. A digital thermometer/hygrometer with a min/max memory function is the minimum you need. For serious growers, a VPD (vapour pressure deficit) controller automates extraction and heating to maintain the optimal temperature/humidity relationship for each growth stage: typically 20–25°C and 50–70% RH during veg, dropping to 40–50% RH during late flower to prevent mould.
Heater
A grow tent with a powerful LED and good extraction usually maintains adequate temperature in the UK for most of the year. In winter, however, a tent in an unheated loft or garage will drop to ambient temperature when the lights go off — which can be 5–8°C in a cold snap. A small tube heater or fan heater on a timer prevents root zone chill that inhibits nutrient uptake. For larger tents, the LightHouse 2kW Greenhouse Heater is well-regarded for its reliability and safety features.
Moisture Meter
Overwatering is the most common cause of plant failure for beginners. A soil moisture meter removes the guesswork entirely. Push it to the base of the root zone: if it reads “wet”, hold off. If it reads “dry”, water slowly and thoroughly. Once you understand how your medium behaves, you can graduate to watering by weight or by run-off percentage.
5. Grow Tent Ventilation: Getting the Air Exchange Right
Ventilation is the single system that beginner growers most consistently underestimate — and the one most likely to cause a grow to fail. Too little extraction leads to heat build-up, stagnant air, elevated humidity and catastrophic mould. Getting the balance right is straightforward once you understand the principles.
The Negative Pressure System
The standard approach for grow tent ventilation is a negative pressure air exchange system. Stale, hot, humid air is extracted from the top of the tent via a carbon filter, ducting and extraction fan. Fresh, CO2-rich air enters passively through lower intake ports. The slight negative pressure created by the extraction fan causes the tent walls to bow inward slightly — this is correct and confirms that no unfiltered air is escaping.
Mount the carbon filter horizontally at the top of the tent on the crossbars; connect it to the extractor fan via acoustic ducting; duct the fan outlet to outside the tent. Keep ducting runs as short and straight as possible — every 90-degree bend reduces effective airflow by roughly 10%.
Calculating Your Fan Requirements
| Tent Size | Volume (m³) | Recommended Fan (CFM) | Recommended Fan (m³/h) |
|---|---|---|---|
| 80×80×160cm | 1.02 | 75–100 CFM | 125–170 m³/h |
| 120×60×150cm | 1.08 | 80–110 CFM | 135–185 m³/h |
| 120×120×200cm | 2.88 | 200–250 CFM | 340–425 m³/h |
| 150×150×200cm | 4.50 | 300–350 CFM | 510–600 m³/h |
| 240×120×200cm | 5.76 | 400–500 CFM | 680–850 m³/h |
6. Grow Tent vs. Grow Room: Which Is Right for You?
For the vast majority of UK home growers, a quality grow tent is the superior choice. Here is how the two options compare directly:
| Grow Tent | Grow Room | |
|---|---|---|
| Setup time | 1–2 hours | 1–3 days |
| Cost | Low (£80–£500) | High (£500–£5,000+) |
| Portability | Fully portable | Permanent fixture |
| Light efficiency | Excellent (Mylar 92–97%) | Variable (paint 75–85%) |
| Scalability | Limited by tent size | Highly scalable |
| DIY skill required | Minimal | Significant |
| Best for | Beginners to intermediate growers | Large-scale / serious growers |
Build a grow room if you are committed to a permanent installation, want to grow at scale, or are converting an existing outbuilding. For everyone else — a quality grow tent is faster to set up, cheaper to buy, easier to maintain and just as productive when properly equipped.
7. Top Grow Tent Brands: What the Experts Choose
Secret Jardin
Secret Jardin’s DR (Dark Room) range has been the benchmark for serious UK growers for over a decade. Constructed from 1680D canvas with a double-layer Mylar lining, heavy-duty zippers and substantial steel poles, DR tents are among the most robust available. The DR150 (150×150×235cm) and DR240 (240×240×200cm) are particularly popular for four-plant and multi-plant setups respectively.
GorillaBOX
GorillaBOX tents offer a strong value proposition for UK growers who want quality without paying Secret Jardin prices. The GorillaBOX Standard uses 600D canvas and a reliable Mylar lining; the GorillaBOX Deluxe steps up to thicker canvas, redesigned zippers and stronger pole connections. Particularly well-suited to growers running their first or second season who want durability without over-investing.
Green Qube
Green Qube has built a reputation for exceptional build quality in the premium segment. Their GQ1.2 and GQ1.5 tents use a patented pole interlocking system that is significantly more rigid than standard push-fit designs, and the zippers are heavy-duty and light-proof. If longevity and build quality are your priority and budget is less of a concern, Green Qube is worth the premium.
Browse our full range of grow tents and reflective sheeting — including Secret Jardin DR, GorillaBOX Standard and Deluxe, and Green Qube — at The Horticulture Company.
8. Common Grow Tent Mistakes (And How to Avoid Them)
Buying Too Small
The most predictable mistake. A 60×60cm tent looks manageable in a product listing but is frustratingly cramped when you factor in a clip fan, a fabric pot, and a light at the correct hanging height. If you can afford the space, go one size up from what you think you need.
Not Accounting for Equipment Height
Lights, fans, carbon filters and ducting all compete for vertical space. Sketch out your vertical layout before you buy. From bottom to top: growing medium and pot, plant height, clearance distance, light fixture, hanging hardware, ducting port. A 200cm tent can disappear quickly.
Ignoring Negative Pressure
If your tent walls are bowing outward rather than inward, you have a problem: unfiltered air is escaping and your carbon filter is bypassed. Check all port seals, zip-runs and duct connections. Run your extraction fan at a slightly higher speed if needed to restore negative pressure.
Overwatering
A grow tent’s enclosed environment retains humidity well, which means plants dry more slowly than they would outdoors. Lift pots to gauge weight, use a moisture meter, and resist the temptation to water on a fixed schedule. Water when the medium is genuinely dry to the finger or by weight.
Frequently Asked Questions
Frequently Asked Questions
A 120×120×200cm tent is the sweet spot for four mature plants in 20–25 litre containers. It accommodates a single 400–600W LED fixture, a carbon filter and extraction fan, and provides enough headroom for most training techniques including topping and LST.
A correctly set-up negative pressure system with a properly sized carbon filter handles the vast majority of odour. Ensure the carbon filter is mounted at the top of the tent connected directly to the extraction fan; all port holes not in use are sealed; zippers are fully closed and the tent walls bow inward slightly; and you open the tent as infrequently as possible during the final weeks of flower.
For longevity and premium build quality, Secret Jardin DR tents are the established benchmark. The 1680D canvas, double-layer Mylar and heavy-duty zippers justify the higher price for growers running multiple cycles per year. GorillaBOX is an excellent mid-range alternative — better value if you are on a budget or running your first few grows before committing to a premium setup.
Yes, and many UK growers do. The main considerations are temperature management (lofts can get very hot in summer and very cold in winter), structural load (ensure joists can support the tent weight plus equipment), and electrical safety (route cables properly and install an RCD-protected socket). A fixed loft ladder is strongly recommended for regular access.
A functional beginner’s setup in an 80×80cm tent (tent, LED light, extraction fan and filter, clip fan, pots and growing medium) can be assembled for £300–£500. A properly equipped 120×120cm setup with quality LED, carbon filter and climate monitoring costs £600–£1,200. A premium 150×150cm setup with high-end LED, controller and dehumidifier sits at £1,500–£3,000+.
Setting Up Your Grow Tent: The Bottom Line
A grow tent is the most cost-effective route to a controlled, productive indoor growing environment for UK growers. Choose the right size — and then go one up from your first instinct — invest in quality canvas and zippers, equip it properly with LED lighting, extraction and carbon filtration, and you have the foundation of a reliable, repeatable grow.
At The Horticulture Company, we stock the full Secret Jardin DR range and GorillaBOX tent lines alongside all the essential equipment you need to complete your setup. If you are unsure what is right for your space, call us on 01926 511151 and speak to one of our growers directly.
Related Articles
- Grow Tents and Setups Guide — complete hub
- Indoor Growing Environment Guide — ventilation & environment
- Are Grow Tents Worth It?
- What Size Grow Tent Do I Need?
- Six Grow Tent Must Haves for Success
Further Reading From The Horticulture Company
For more expert growing guides, our nutrients and additives guide explains how to build an effective feed programme, while our LED grow lights comparison and grow tents guide help you optimise your setup. The indoor growing environment guide covers temperature, humidity and CO₂, and the complete UK grow tent guide takes you through setup from scratch.
For authoritative guidance on plant nutrition and health, the Royal Horticultural Society publishes evidence-based growing advice used by professionals and hobbyists alike. Visit The Horticulture Company’s store in Kenilworth, Warwickshire, or browse our full range of products and guides online.
Shop the Products in This Guide
Browse by category: Gorilla Box Grow Tents, Grow Tents and reflective sheeting, Loft Grow Tents, Reflective Sheeting, Secret Jardin Grow Tents, Carbon Air Filters, Ducting and Fittings, Extraction Fans and Kits.
Shop featured products: GORILLABOX DELUXE TENT, GORILLABOX ROOF TENT 1.2 X 1.2 X 1.8 M, WHITE LIGHTITE SHEETING, BUDBOX PRO 1.2 X 2.4 X 2.2 M (SILVER).